11/16/2009

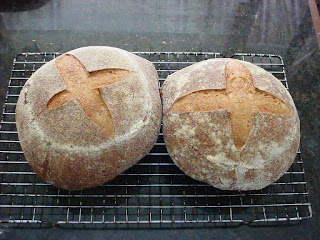
Borkovetz Rye - Updated


This recipe was inspired by a desire to recreate the rye bread that my great grandmother would make. While I had the recipe, I could never get it to work. All of the measurements were approximate and it called for cake yeast which is rather difficult to find and a pain to work with. However, I had the techniques from Peter Reinhart's "Whole Grain Breads" and his recipe for transitional rye, which is the foundation for this bread. So, here it goes...

"Borkovetz Rye" - Makes 2 one pound sandwich loaves

Pre-dough - Soaker

12 oz white rye flour
4 oz whole wheat flour
1 tsp salt
0.25 oz instant mashed potato flakes
2 oz Saco buttermilk powder
11 oz water at room temperature

Combine all of the soaker ingredients together in a large bowl. They should come together into a ball of dough that is moist but not gummy. Cover bowl with plastic wrap and let stand at room temperature for 12 hours (overnight).

Pre-dough - Biga

16 oz unbleached white bread flour
1/2 tsp instant yeast
10 oz water at room temperature

Combine all of the biga ingredients together in a bowl. Wet hands with cold water and knead for about 2 minutes until all the flour comes together to form a ball of dough. Let stand 5 minutes for flour to hydrate and dough to relax a little. Prepare a large plastic storage container with spray oil. Knead the biga for another minute and then place in the storage container and place the cover of the container on lightly.

Let stand at room temperature. After 2 to 3 hours, the dough should rise a little. Degas the dough, return to container and place the cover tightly on the plastic container. Refrigerate overnight. 2 hours before starting the next day, remove the dough from refrigerator so it can return to room temperature.

Final Dough

2 oz white rye flour
All soaker
1 1/4 tsp salt
All biga
0.50 oz instant yeast
1 oz extra virgin olive oil
2 oz white corn syrup
1 oz honey
0.50 oz whole caraway seeds
Extra white rye flour for adjustment and dusting the board

Substitution for caraway seeds

0.40 oz crushed fennel seeds
0.75 oz dried tomato

Turn out the soaker onto a cutting board dusted with some of the 2 oz of white rye flour. Cut into small pieces with a bread scraper and then return to the bowl. Add the salt. Turn out the biga onto the cutting board, again dusted with some of the 2 oz white rye flour. Again, cut into small pieces and add to bowl. Add yeast, oil, syrup and honey to the bowl. Also add the caraway seeds or the substitution of fennel and tomato. Combine with spoon until components start to come together. As you combine with the spoon, add any remaining white rye flour from the 2 oz measured quantity.

Turn out dough onto a heavily floured board and continue the mixing by kneading. Knead for 6 minutes, dusting the board as little as possible to keep the dough from sticking. Let rest on the board while you prepare a clean bowl for rising with spray oil. Knead the rested dough for another 1 minute, form into a tight ball and place in bowl for rising. Let rise for approximately 60 minutes until about 1 1/2 times size.

After the first rise, turn the dough out onto a lightly floured board and divide into 2 equal pieces. Form each for a loaf pan and place in oiled 8 1/2" bread pans. Spray the top lightly with spray oil and cover loosely with plastic wrap for proofing. Proof for approximately 60 minutes until dough fills out the pans.

15 minutes before baking, remove the plastic wrap and score the top of the bread with a sharp knife. Preheat oven to 425 degrees Fahrenheit. When preheated, place loaves in oven and reduce temp to 350 degrees. Bake for 20 minutes and then rotate so baking is even. Bake for approximately another 20 minutes until the internal temperature registers 190 degrees or higher. Take the loaves out of oven, remove from baking pans immediately and let stand on cooling rack. Cover the loaves with towel and let cool for at least 1 hour before slicing to allow the crumb to set.

UPDATE - You can substitute 13 oz if fresh buttermilk for the dry milk and water. The flavor turns out better. You will also get a better result of you drop the temp to 325 degrees and bake for a total of 60 minutes (30 minutes, rotate and 30 more).
9/14/2009

This weekends baking...

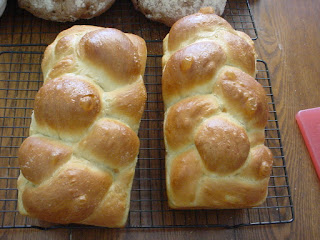
This weekend, I did a bit of baking... I did some challah.


I also tried a new recipe for a rye pecan bread...


... and then some carrot cake to celebrate our anniversary...


9/07/2009

Last Weekends Baking...

Been meaning to post these pictures but time seems to fly by... Last weekend I did a bunch of baking for the after party of my nephew's baptism. My brother and sister-in-law asked for several loaves of bread. I did a regular sandwich rye and a marble rye. For one loaf of the marble rye, I tried a Winston Knot braid. It turned out pretty well and made for a nice loaf.


I also did a double batch of Vermont Sourdough. I played around with shapes a little and tried to make some small round loaves to use for soup. I tried 1/2 lb loaves but they turned out a little small. A 3/4 lb size would probably work better.


8/16/2009

This weekends baking...

This weekend I tried potato bread again and another attempt at Peter's basic sourdough.


Then I tried Pan de Cioccolate from Suas' book. It uses a sourdough starter and then has a bunch of cocoa in the dough and some chocolate bits added. While it took a long time to ferment and proof, it turned out very well for a first effort. Is very tasty with peanut butter.


A fare amount of the baking I do ends up at either my work or my wifes work. Someone from Lou's office requested pumpkin scones a few weeks ago. As an experiment, I took a recipe that I had and tweaked it to replace some of the butter and buttermilk with pumpkin puree. I then spiced it like a pumpkin muffin with cinnamon, nutmeg, clove and some candied ginger. The end result was pretty good but the recipe needs a little refining. The flavor was OK, but they turned out a little dense. I think I didn't bake them at a high enough temperature and the butter melted before the dough matrix could set up. Guess I will have to make them again. I am sure Lou will be very disappointed if I have to do them again.

8/02/2009

This weekends baking...

This weekend was another big bake. It started innocent enough. I had planned on trying Hamelman's Vermont Sourdough and another run at sticky buns from "Advanced Bread and Pastry". The sourdough took a bit of time to do but turned out really well. It has a nice crumb and has a really good sourdough flavor.


The sticky buns also turned out well and are going to work with my wife as an office treat.


But then scope creep occurred. It all started with a quart of buttermilk that was about to expire. Not wanting to waste it and also seeing that I needed to feed my rye sourdough starter, I decided to try Reinhart's Rye Sandwich Meteil. It turned out pretty well. It has a very intense flavor and a pretty dense texture. I had a little trouble with the oven temperature so the free standing loaf got kinda flat but will definitely try that one again.


Finally, to use up the rest of the buttermilk, I made some scones using the buttermilk scone recipe from the Tartine cookbook. I made some with cranberry and the zest of grapefruit and some with apricot, ginger and a pinch of allspice. Compared to the ones I have made from the "Advanced Bread and Pastry" book, these were very decadent. They have about 50% more butter than the other ones so the texture becomes more like a pie crust. While good, not something one could really eat on a recurring basis. I did like the favor of the buttermilk so might have to rework the other recipe with that in mind.


All in all, the weekend bake was very satisfying but was way more than I should have taken on. Just ate up to much of the weekend. Will have to learn to restrain myself in the future.

7/26/2009

This weekends baking...

This weekend, I did a pretty large bake. I did the old standbys of oat bran-flax bread and challah. I tried a different braiding pattern for the challah this time. In Hamelman's book, he describes a "Winston Knot". The loaf on the lower right is my attempt at it. I like the size of loaf it makes but I din't roll out the strands long enough. By the time I got it into shape, they got a little smashed together. Will have to try it again.


This week, my King Arthur order came with my new "pet". I ordered some of their sour dough culture so I could start experimenting with different sour dough recipes. I have already built it up into 2 separate levain starters. One is traditional white flour which I have nicknamed "Renee".

The other I am in the process of converting to a rye levain which I have nicknamed "Heidi". I think I will be keeping them both as stiff levains at about 80% hydration. According to Hamelman, stiffer levains will develop a stronger sour flavor which is my goal. Instead of throwing out some of the levain with the last feeding of "Heidi", I decided to take a try at a plain old Pain au Levain and tried the recipe from Peter Reinhart's "Bread Bakers Apprentice".

I cheated a little because I spiked the final dough with some instant yeast to accomidate my schedule. Otherwise it would have been a 4 hr ferment and a 2 hr proof. Adding the yeast cut things down to 90minutes and 60 minutes. Bread turned out pretty well with just a hint of sour flavor. Let the experimentation begin...

7/21/2009

This weekends baking...

This weekend I did a fair amount of baking. I did Pane Siciliano which is becoming a standby when I have the prep time.


A month or so ago, I got Jeffery Hamelman's "Bread: A Baker's Book of Techniques and Recipes". He had a recipe for a roasted potato bread which I tried this weekend. Aside from the screw up I did on the pre-ferment, it turned out pretty well and Lou proclaims it her new 2nd favorite bread for peanut butter and jelly. The PBJ index tends to be a guiding factor in each weekends bake.


Lastly, I took a run at brioche from the workshop I took this summer. I had a little trouble with the mixing of the dough so it didn't develop the structure it was suppose to have. I turned most of it into apricot-pear tarts with some home made pastry cream. Thus proving even failed attempts can usually be rescued with proper application of some eggs, butter and/or sugar. The book from the class has a couple other variations on brioche that I might try next time.

6/28/2009

Back to baking again...

Well, after more than a month, I finally was able to get back to my weekly ritual of baking. You see, I was off to San Francisco for a professional baking class at the San Francisco Baking Institute and got back last weekend. I took the Viennoiserie class to learn how to make croissants, Danish and other buttery goodness. The class was excellent and it was probably one of the most satisfying things I have done in a long time.

Before all the knowledge leaked out of my ears, I wanted to try something from the class. I decided to start simple and made sticky buns. They turned out pretty well but I need to adjust the baking temperature and time. Everything we learned in class is targeted for a bakery shop so I have to translate some of the techniques to make it work at home.

The biggest thing is working out a baking temperature and time for a regular oven when the recipe is calibrated for a convection oven. I overshot the temperature a little and the tops were getting dark but when I tipped the buns out, the glaze hadn't fully caramelized. Still very edible, but next time I think I will turn the temperature down a bit and bake them for just a bit longer.


I also did another run at baguettes. They turned out well and I was really pleased with the crust. You could actually hear the crust cracking when I took them out of the oven.

5/17/2009

Whole Wheat Scones

Recently, I have been on a scone making kick. It started by trying the butter scone recipe from "Advanced Bread and Pastry" but has since progressed to an experiment to make a whole wheat lower fat scone. It started by taking the suggestion in Alton Brown's "I'm Just Here for More Food" to substitute some whole wheat flour for the white flour in biscuits. Given that a butter scone is nothing but a fancy biscuit, I applied that principle by substituting a quarter of the white flour in the original recipe with whole wheat flour. I also used his method of kneading to make this version. His method results in a folding of the butter which causes a nice layering of the product when baked.

To lighten it up further, I used the USDA food database so I could calculate the amount skim milk to replace the cream in the original recipe, while keeping the moisture content constant. In the end, I did add just a touch more skim milk but I attribute that to the higher hydration needs of the whole wheat flour. So, here goes...

Whole Wheat Scones

Fat Works

11.15 oz all purpose flour
3 oz whole wheat flour
1.75 oz granulated sugar
0.75 oz baking powder
1/2 tsp salt
4 oz (one stick) unsalted butter (chilled)

Additions

5 oz chopped dates + 1 oz chopped candied ginger + 1 tsp lemon zest
or
5 oz chopped dried apricots + 1 oz chopped candied ginger + 1/4 tsp allspice
or
5 oz dried cranberries + 1 tsp orange zest

Wet Works

5.8 oz skim milk
1 oz honey
1 large egg

30 minutes before starting, place 1 stick of butter in the freezer and make room in the freezer for a large mixing bowl. Before starting also prepare any additions that need chopping. The dates or apricots should be in approximately 3/8" pieces and the ginger should be smaller than 1/8". Cranberries can be used as is.

Begin by combining the flours, sugar, salt, baking powder and any additions in the bowl that you made space for in the freezer. Mix until uniform. Taking a coarse cheese grater, quickly grate the chilled butter into the bowl and then using your hands, work the butter into the dry ingredients. The butter should break down into something the size of peas. Place the bowl in the freezer while you prepare the remainder of the process.

Preheat the oven to 375 degrees Fahrenheit and prepare a cookie sheet with parchment paper. While the fat works are cooling, combine the wet works in a separate bowl and whisk together until uniform.

On a work surface, place two 36" pieces of wax paper in the shape of a cross. If you have a silicone baking mat, place that under the wax paper to help with the kneading process later. The mat is optional but one just has to be a little careful not to poke the wax paper without it. The pictures below give a sense of the process that is coming up.


When the oven is pre-heated. Take the fat works out of the freezer and mix in the wet works with a stiff spoon. The mixture will still be fairly dry but will finally come together as we knead it. Lightly dust the area where the two pieces of wax paper cross with flour and then pour out the mixture. Using your hands, form the mixture into a square as in Picture A above.

Being the kneading process by taking the paper or silcone mat and using it to fold about 1/3 of the dough onto itself much like one would fold a letter (Picture B). When you are done, you should get something like Picture C. Repeat the process from the other side and you should get something like Picture D.

As Alton points out, this method allows you to knead the dough without heating up the butter with your hands. It also avoids all manner of dough sticking to your hands. Using the wax paper and your hands, flatten the dough out to about 3/4" thick and rotate the whole assembly by 90 degrees. When done, it should like like Picture E below.


Repeat the process again as Picture F illustrates. After the second set of folds, rotate 90 degrees again and slide the bottom piece of wax paper out and place it on top of the dough as in Picture G. Carefully flip the assembly over and separate the piece of wax paper that was previously on the bottom from the top of the dough.

Perform the folding process one last time and the end result should look like Picture H. Placing wax paper on top, flatten the dough one last time to a rectangle approximatly 7" by 9" and about 3/4" thick. Using a dough scraper, divide into 12 pieces as pictured in Picture I. Using the dough scraper to carefully separate the dough from the wax paper, transfer the unbaked scones to the parchment covered cookie sheet.

Bake for 13 minutes at 375 degrees and then rotate. Bake for approximatly 13 minutes longer until the scones take on a little color and the bottoms are well browned. Let cook for 20 minutes before eating.


This Weekends Bread

Recently I bought a new book called "Bread: A Baker's Book of Techniques and Recipes" by Jeffery Hamelman. I like this book so far. It is well written and has a good set of recipes. This weekend I took a run at his Ciabatta with Poolish. For a first go, it turned out pretty well. The loaves got a little large and the next time I will have to divide it into 4 instead of the recommended 3. I could have also left them in the oven a little longer so they took on some more color. Will have to try it again.


5/03/2009

This weekends bread

This weekend I did three breads. There was my 12-grain bread...


And then there was cranberry-pecan cinnamon bread...


And lastly, another attempt at pane siciliano. This attempt turned out much better. The crumb had a better texture and the crust was much better.

5/02/2009

Oatmeal Cranberry Cookies

A simple drop cookie that was originally inspired by the Fall holidays.

Dry Works

3 cups rolled oats (quick ones are best)
1 cup all purpose flour
1/2 tsp baking soda
1 tsp salt

Cream Works

1 cup brown sugar (packed)
1/2 cup white sugar
3/4 cup butter (softened)
1/4 cup water
1 egg
1 tsp vanilla
1 tsp Penzeys "Pumpkin Pie Spice Mix", "Baking Spice Mix" or cinnamon

Additions

2 cup dried cranberries


Before starting, pre-heat oven to 350 F with racks spaced in the center of the oven. Prepare 3 cookie sheets with parchment paper and some cooling racks for the cookies after they are baked.

Combine the dry works in a bowl and mix well. Set aside.

In a second, larger bowl, combine the cream works and whisk until well mixed and uniform. When the oven is pre-heated, add the dry works and the cranberries to the bowl containing the cream works and mix well with a stiff spoon.

Using an ordinary tableware spoon, portion out the cookie dough onto the parchment covered baking sheets, using your fingers to help form a ball. Each portion should be about the size of a golf ball. Space 8 cookies to a baking sheet.

When you have the first cookie sheet filled, place on the lower rack of the oven and start a timer for 10 minutes. Proceed to portion out the next cookie sheet but wait until the first one has baked for 10 minutes.

After 10 minutes, move the first cookie sheet to the top rack, rotating it in the process to ensure even baking. Place the second tray on the lower rack of the oven and restart the timer. Proceed to portion out the third cookie sheet.

After 8 minutes on the timer (18 minutes total), check the top cookies. They will be done when the bottoms show a little color and they have spread to about 3/8 inch thick. Note - they will still be a bit soft so use care when checking. If they aren't done, check after the full 10 minutes. If they are done, adjust the timer to 9 minute intervals.

If done, remove from oven, move the cookie sheet from the lower rack to the top rack, again rotating and restart the timer. Remove the baked cookies from the parchment and place on a cooling rack, being careful as you move them. As they cool, they will firm up.

Portion out some more cookies and repeat the process until all the dough is used up. You should end up with between 32 and 36 cookies.

4/19/2009

This Weekends Bread

This weekend, I made some rye bread. This is a darker rye made with molasses which gives it a little different character.


I also gave bagel making a try. I used the bagel recipe from Peter's "The Bread Baker's Apprentice". They turned out pretty well for a first run but I need to practice it a bit more.


4/05/2009

This weekends baking...


This weekend I did a fair amount of baking. There was the old standby transitional whole wheat bread made with butter milk from Peter's book.


I also did pretzel rolls. I got a new baking book a month or so ago called Advanced Bread and Pastry by Michel Suas. The book is an excellent technical manual by the founder of the San Francisco Baking Institute. I took the recipe for pretzels from the book and modified it to use rye flour. This is different from my other pretzel recipe because it uses a pre-ferment called a Poolish to add an additional flavor component. The recipe will be at the end of this blog post.

The last baking I did this weekend was to make cranberry scones with orange zest. I used the butter scone recipe from the Advanced Bread and Pastry book but I used Alton Brown's "Biscuit Method" from his book "I'm Just Here For More Food". By using Alton's method, the scones come out very light and flakey. According to my official taste tester (aka my wife), this produces a result that is so pleasing, she needs a moment alone afterward.


Soft Rye Pretzels - Take II

Poolish

1.75 oz bread flour
1.75 oz water
1/8 tsp instant yeast

Mix together Poolish ingredents and let stand lightly covered at room temperature for approximatly 12 hours. It will be ready to use when it is very bubbly.

Final Dough

12.70 oz bread flour
4.00 oz white rye flour
0.80 oz wheat gluten
0.50 oz non-diastatic malt powder
0.15 oz instant yeast
0.40 oz salt
all Poolish
5.15 oz water (body temperature)
5.15 oz milk (body temperature)
0.50 oz butter (melted)

Water Bath

1 oz salt
3 oz baking soda
1 quart (approx) water

Combine the dry ingredents in a large bowl and add the Poolish. In a microwave safe dish, warm the water and milk until just body temperature (approx 95 degrees). If you want you can include the butter to soften it. Otherwise melt the butter until soft but not liquid.

Mix together until you have a rough dough and then turn out onto a well floured board and knead for approximatly 8 minutes. Let rest for about 5 minutes while you prepare a clean bowl with spray oil. Knead for another 2 minutes and then form a tight ball.

Place in clean oiled bowl and cover with plastic film to ferment for approximatly 1 hour until the dough increases by 1 1/2 times. Before the end of fermentation, prepare 2 baking sheets with parchment paper that has been lightly sprayed with oil. This will help release the pretzel shapes when it is time to boil them

After fermenting, turn the dough out onto a floured work surface and divide into 12 pieces. Form each into a small ball and let rest for 5 minutes. After resting, roll each into a 3/8" - 1/2" diameter rope approximately 18" long and then form into a pretzel shape. If the dough is still to elastic, let rest for a few minutes and then continue rolling.

Place pretzel shapes on the baking sheet covered with parchment paper for proofing. Loosely cover with cling wrap while proofing. Proof for 1 hour until the dough expands from 3/8" to approx 3/4" diameter. While the dough is proofing, prepare a water bath by placing the water, salt and baking soda in a large stainless steel pot.

NOTE - Do not us an aluminum pot because the baking soda will react with aluminum.

Bring water to boil and stir to dissolve salt and baking soda. Reduce the temp so the water is just at a light boil. Before you start processing the pretzels in the water bath, preheat oven to 425 degrees.

After the pretzels have proofed, place them one at a time in the water bath; letting one side in the water for 30 seconds and then flipping them with a large sloted spoon. After the other side has cooked for 30 seconds, remove from water and place on baking sheet again. After all pretzels have been processed, place in oven. Bake for 15 minutes and then rotate the pans for even baking. Continue baking for approximately another 15 minutes until the pretzels take on a dark brown color. Let cool 20 minutes before eating.

Makes 12 - 5" pretzels. Can also make 8 Kaiser style rolls.

3/22/2009

This Weekends Bread

This weekend resulted in three batches of bread. The first was my old standby of 12-grain sandwich bread. It's made with 12-grain cereal from the co-op store, rye, oat meal, wheat bran and flax meal.


I also did another run of the whole-wheat cranberry pecan cinnamon bread (WWCPC). I used some of the SAF Gold yeast that I got for the folks at King Arthur. I got a much better rise this time which I attribute to the yeast. Funny story about the yeast. Turns out that it is made about 2 miles south of where I live. So, to get to me, it went from Milwaukee to Vermont and back to Milwaukee. As one person pointed out, will need to purchase a bunch of carbon offsets for that one.


The last bread for the weekend was my first attempt at Pane Siciliano from Peter Reinhart's "The Bread Baker's Apprentice". It is a French bread style with about 40% semolina flour which gives it more of a nutty flavor. Flavor turned out but I had some issues with the shaping and baking. Will certainly have to try it again.

3/15/2009

This weekends baking...

This weekend I did a batch of rye bread... While I polled a bunch of my co-workers as to whether I should make rye or multi-grain and the polling was leaning toward the multi-grain, I found some pastrami at the store on the way home. That forced me to go the other way....


I also made chocolate stout cake from a recipe from the King Arthur site. It turned out pretty well but is very very rich. Will be taking some into work which should but the whole office into an insulin comma for the day.

3/04/2009

Forming kolaches...

In my previous post about making Bohemian style rolls, I talked about forming kolaches. In that post, I hadn't confirmed the process. Well, a few weeks ago, I finally got around to confirming the process and also documented the forming process.


After the ferment of the dough, divide with a dough scraper into 36 pieces. Roughly form into a ball and then form by taking your right palm and flexing it back as far as you can. Place the ball of dough in your palm and then using your cupped left hand, lightly roll the ball around with more pressure on the sides than the top. With a little practice, you should form a tight ball somewhere between the size of a golf ball and a walnut.


Place on sheet pans with parchment paper separated by 1 1/2" from the sides and 3" from each other. Lightly depress each ball with your fingers and then cover with cling wrap to proof for about 30 minutes until the dough rises approximately 1 1/2 times. After the first proof, use your fingers to depress the centers and spread the dough to form a rim of dough approximately 1/4". Let proof for another 15 to 20 minutes. Degas the centers again and fill. Bake as directed by recipe.

Link to keep track of... Wheat Gluten...

Found this paper from Oklahoma Extension that appears to give the information needed to calculate how much wheat gluten should be added to flour of a given protein to raise the protein content. This will be handy so I wanted to keep track of it...

3/01/2009

How to make kaiser rolls...

A month or so ago, I did a post about making Bohemian rolls. In that post, I didn't have pictures of how to make the kaiser style roll. Well, here is a picture series of how to do it.

Bread this weekend

This weekend, I did 3 different breads. I did classic french baguettes which turned out pretty well. They had a nice crust to them. I also attempted a new bread from Peter's "Whole Grain Breads" book called anadama bread. It is a whole wheat bread with corn meal. It turned out
OK but ended up on the heavy side. I think I over fermented it and then it did not have enough to finish rising during the final proof. It has good flavor though and I will have to try it again.


I also made some pretzel rolls using my pretzel recipe. I tried them with the King Arthur high protein flour as an experiment. The texture was excellent and the only real downside to using the flour is the cost. Might try a mix of just regular KA bread flour and some wheat gluten the next time.

Bookshelves

This weekend I finished up a pair of bookshelves for your breakfast room. One of them is shown above. They are made of oak plywood with solid oak for the face frames and top. They are sized to match the old farmhouse kitchen table we have. They haven't been stained and finished yet but that will have to wait until the weather gets warmer. Until then, they have been put into immediate service as storage for our cookbook collection.

2/15/2009

Saturday of baking

This Saturday, I did a bunch of baking. Did a batch of challah.


Did a batch of my "Pumpernickel in Quotes".


Did some whole wheat cranberry-pecan cinnamon (WWCPC) bread. Need to get some different yeast before I try this one again. Have been reading a new book on baking called "Advanced Bread and Pastry" authored by the founder of the San Francisco Baking Institute. It talks about osmotolerant yeast which is a special strain of yeast that survives highly acid or sugary doughs. Since the WWCPC bread is made with buttermilk and has lots of sugar, it should be a perfect application for this. Been digging around and the folks at King Arthur Flour have SAF Gold yeast which appears osmotolerant based on the writeups on the internet. My next order to King Arthur will have to get some.


Which reminds me, buy King Arthur flour. For the holidays, I bought 25lbs of bread flour from SAMS in an effort to economize. I certainly regretted it and my wife had to endure much swearing. So, now I am back to buying KA bread flour in 25lb orders from the web site.

The other baking project this weekend was an attempt at Red Velvet Cake for Valentines Day. Lou made dinner and I was in charge of the cake. I used Bobby Flay's recipe for the cake and modified the frosting from my carrot cake recipe by adding a little milk and powdered egg white. It turned out pretty good but the cake wasn't as moist as I would have liked, but that didn't stop Lou and I from eating it...

2/08/2009

Last and this weekends bread...


Last weekend, I did some whole wheat brand flax bread.


This weekend, I made some multi-grain and I also tried a new bread from Peter's "The Bread Baker's Apprentice" called Pain a I Ancienne. I formed it in the shape of a ciabatta.